Complete guide for setting up Neovim as an IDE.
Complete step by step guide for setting up Neovim Lsp and more.
I have been using Vim for about a year now and I am still learning new things every day. When I first started using Vim, I used a VSCode extension and became familiar with all the motions and basics.
At that time, one thing that really stopped me from completely switching to Vim was the seeming overhead involved in configuring it, and the difficulty I had keeping up with bugs when setting up plugins.
One of the things about Vim is that you can tailor and customize it to fit your own needs and preferences. While options like LunarVim exist, I feel like I'm missing out on a lot of Vim's by using pre-configured options like those.
So In this article, I am gonna work you through step by step on how you can tailor your own Neovim. I am gonna be explaining some of the plugins that I use day by day while coding.
# Installing Neovim
I have an Arch Linux container that I will use to set up Neovim from scratch. If you are using a different platform, you can download it from this release page .
sudo pacman -S neovimCheck if you have set up Neovim correctly by running the command in your terminal.
So I will be using v0.9.1 for this blog.I recommend using a version of Neovim that is 0.8 or higher because since version 0.8, Neovim has added a built-in language server protocol (LSP) client that can be configured to work with many programming languages.
# Config location
By default, Neovim configuration files are located at ~/.config/nvim/init.vim on Linux and macOS, and ~/AppData/Local/nvim/init.vim on Windows.
If the ~/.config/nvim/ directory doesn't exist, you may have to create it manually.
To check if Neovim is using your config, create init.lua in your config directory. Add a print statement to the file and check if it runs when you restart Neovim. If it doesn't, check your config path.
-- ~/.config/nvim/init.lua
print("Hello World");
Next, create a folder structure like this. While this structure is optional, it can help organize your settings effectively. You can replace my-neovim with any folder name you prefer.
~/.config/nvim/
├── lua/
│   └── my-neovim/
│       └── init.lua
└── init.lua
To import your init.lua file from my-neovim folder to your root config file, you can use the require function in your root init.lua file.
-- ~/.config/nvim/init.lua

require('my-neovim')
This will import your settings from the init.lua file located in the my-neovim folder.
Check with a print statement to see if init.lua from my-neovim working correctly.
So far if you have followed accordingly you should see any appropriate print statements when you start up Neovim.
# Setting basic Vim configurations
We have set up our config. It's time to add some Vim configs to your editor. Create a file named set.lua in your my-neovim folder which we will used to setup the bare bone Vim settings.
I store my basic Vim configurations such as line numbers, syntax highlighting, and cursor line highlighting in the set.lua.
Add these configs in the set.lua file
vim.opt.guicursor = ""
vim.opt.spelllang = "en_us"
vim.opt.nu = true
vim.opt.relativenumber = true
vim.opt.clipboard = "unnamedplus"
vim.opt.tabstop = 4
vim.opt.softtabstop = 4
vim.opt.shiftwidth = 4
vim.opt.expandtab = true
vim.opt.smartindent = true
vim.opt.wrap = false
vim.opt.hlsearch = false
vim.opt.incsearch = true
vim.opt.termguicolors = true
vim.opt.scrolloff = 8
vim.opt.signcolumn = "yes"
vim.opt.isfname:append("@-@")
vim.opt.updatetime = 50
vim.opt.colorcolumn = "80"
So far now your Neovim should somewhat ok with the configs. So lets add remaps to your Neovim.
# Setting up remaps
Create a file named remap.lua in the my-neovim folder. Like we did with set.lua, make sure to import remap.lua in your init.lua file.
~/.config/nvim/
├── lua/
│   └── my-neovim/
│       ├── init.lua
│       ├── set.lua
│       └── remap.lua
└── init.lua
Here is how your init file should looks like after import
~/.config/nvim/lua/my-neovim/init.lua

require("my-neovim.set")
require("my-neovim.remap")
And add these configs to your remap.lua file.
-- leader key mapping
vim.g.mapleader = " ";

-- Open netrw
vim.keymap.set("n","<leader>pv",vim.cmd.Ex);

-- move up and down
vim.keymap.set("v", "K", ":m '<-2<CR>gv=gv")
vim.keymap.set("v", "J", ":m '>+1<CR>gv=gv")

-- half page movement
vim.keymap.set("n", "<C-d>", "<C-d>zz")
vim.keymap.set("n", "<C-u>", "<C-u>zz")
You can now customize all your favorite remaps in this file.
Hopefully now you can get the idea of how you can tinker the basic configurations now.
# Adding plugins with Packer
This is the real fun part now . We gonna try and install extensions and plugins to our Neovim.
Packer is a tool for managing plugins for Neovim. It's written in Lua and is designed to be fast, simple, and user-friendly. With Packer, you can easily install and manage plugins from the official Neovim plugin repository or from other third-party sources.
Go ahead and read the Readme of the repository .
First clone this repository to somewhere on your packpath, For example Mac and Linux.
git clone --depth 1 https://github.com/wbthomason/packer.nvim\
 ~/.local/share/nvim/site/pack/packer/start/packer.nvim
Create a file named packer.lua in your my-neovim folder and add the following code provided in the repository's readme. You can use the first packer line at the beginning of the function for packer to manage itself.
In the future, we will add more and more extensions in this function.
-- This file can be loaded by calling `lua require('plugins')` from your init.vim

-- Only required if you have packer configured as `opt`
vim.cmd [[packadd packer.nvim]]

return require('packer').startup(function(use)

  -- Packer can manage itself
  use 'wbthomason/packer.nvim'

	-- more and more packages will come here

end)
Your folder structure should now look like this.
├── lua/
│   └── my-neovim/
│       ├── init.lua
│       ├── set.lua
│       ├── remap.lua
│       └── packer.lua
└── init.lua
# Our very first plugin
Let’s add our very first theme which is the most important of the editor. Add the following line in the function body of your packer and then run :source in the command mode of Neovim and run :PackerSync for packer to manage the plugin that we just added.
use "EdenEast/nightfox.nvim"Then you should have something like this
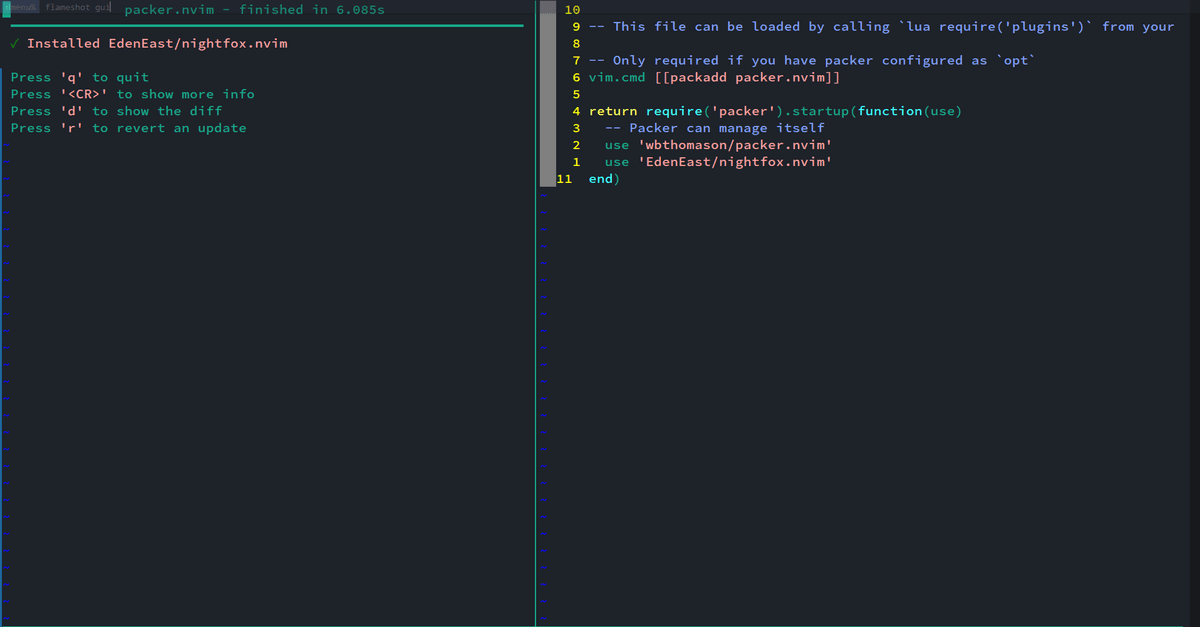
After installing the package, try running :colorscheme nightfox. Then all the colors should be working now!
Remember:colorscheme nightfox is a Vim command. We can add that to our set.lua to make it work whenever we start our Neovim.
# Customizing plugins
After folder is a feature in Neovim that runs commands automatically when you open a specific directory. You can use this feature to set up plugins. With it, you can set up plugins to load automatically when you open specific filetypes or directories. This can save you a lot of time since you won't have to load plugins manually every time.
Create a folder name after in the root of your config. Create a folder called plugin inside the after folder. This folder is used to store plugins that you want to load after the built-in plugins have been loaded. You can use this folder to override built-in plugins or to add new plugins.
Here is what your config structure should look like this.
~/.config/nvim/
├── after/
│   └── plugin/
│       └── example-plugin.lua
├── lua/
│   └── my-neovim/
│       ├── init.lua
│       ├── set.lua
│       ├── remap.lua
│       └── packer.lua
└── init.lua
We gonna use this after/plugin folder from now on whenever we want to override built-in plugins or to add new plugins.
# Adding nvim-treesitter
One of the best plugins to enhance Neovim is called nvim-treesitter . This plugin improves the highlighting of keywords, indentation, and text-selection methods in Neovim. It's powered by the Treesitter parsing library, which is a fast and versatile parser that can work with many programming languages.
To install nvim-treesitter via packer add these lines in the function body of the packer.lua file that we created earlier.
-- Treesitter
  use('nvim-treesitter/nvim-treesitter', {run = ':TSUpdate'})
  use 'nvim-treesitter/playground'
Don’t forgot to always run
:sourceand then:PackerSyncwhenever you update or add a new plugin in packer.
After installing nvim-treesitter via packer, create a file named treesitter.lua in the after/plugin/ directory. Then, add the following configuration provided by the nvim-treesitter plugin.
require'nvim-treesitter.configs'.setup {
    autotag = {
        enable = true,
        filetypes = {
            'html', 'javascript', 'typescript', 'javascriptreact', 'typescriptreact', 'svelte', 'vue', 'tsx', 'jsx', 'rescript',
            'xml',
            'php',
            'markdown',
            'glimmer','handlebars','hbs'
        }},
  -- A list of parser names, or "all" (the five listed parsers should always be installed)
  ensure_installed = { "c", "lua","javascript","typescript","rust","html","css", "vim", "vimdoc", "query" },

  -- Install parsers synchronously (only applied to `ensure_installed`)
  sync_install = false,

  -- Automatically install missing parsers when entering buffer
  -- Recommendation: set to false if you don't have `tree-sitter` CLI installed locally
  auto_install = true,

  ---- If you need to change the installation directory of the parsers (see -> Advanced Setup)
  -- parser_install_dir = "/some/path/to/store/parsers", -- Remember to run vim.opt.runtimepath:append("/some/path/to/store/parsers")!

  highlight = {
    enable = true,
    -- NOTE: these are the names of the parsers and not the filetype. (for example if you want to
    -- disable highlighting for the `tex` filetype, you need to include `latex` in this list as this is
    -- the name of the parser)
    -- list of language that will be disabled
    -- Or use a function for more flexibility, e.g. to disable slow treesitter highlight for large files
    -- Setting this to true will run `:h syntax` and tree-sitter at the same time.
    -- Set this to `true` if you depend on 'syntax' being enabled (like for indentation).
    -- Using this option may slow down your editor, and you may see some duplicate highlights.
    -- Instead of true it can also be a list of languages
  },
}
With nvim-treesitter installed and configured, you should now have advanced syntax highlighting, indentation, and text-objects for your chosen programming language.
# Installing nvim-lspconfig and lsp zero
Nvim-lspconfig is a plugin for the text editor Neovim. It provides an easy way to set up and use the Language Server Protocol (LSP). LSP is a protocol that lets the editor talk to a language server that helps with things like code completion, formatting, and error checking. Nvim-lspconfig works with many programming languages, including C++, Python, Rust, and TypeScript.
To install add the following in your packer.lua file and now I believe you can see the pattern for adding plugins in Nvim.
use {
	  'VonHeikemen/lsp-zero.nvim',
	  branch = 'v1.x',
	  requires = {
		  -- LSP Support
		  {'neovim/nvim-lspconfig'},
		  {'williamboman/mason.nvim'},
		  {'williamboman/mason-lspconfig.nvim'},

		  -- Autocompletion
		  {'hrsh7th/nvim-cmp'},
		  {'hrsh7th/cmp-buffer'},
		  {'hrsh7th/cmp-path'},
		  {'saadparwaiz1/cmp_luasnip'},
		  {'hrsh7th/cmp-nvim-lsp'},
		  {'hrsh7th/cmp-nvim-lua'},

		  -- Snippets
		  {'L3MON4D3/LuaSnip'},
		  {'rafamadriz/friendly-snippets'},
	  }
  }
Then create a file named lsp.lua in our after/plugin folder and add the following configs.
local lsp = require('lsp-zero')
lsp.preset('recommended')
lsp.ensure_installed({
	'tsserver',
	'eslint',
	'rust_analyzer',
})
local cmp = require('cmp')
local cmp_select = {behavior = cmp.SelectBehavior.Select}
local cmp_mappings = lsp.defaults.cmp_mappings({
  ['<C-p>'] = cmp.mapping.select_prev_item(cmp_select),
  ['<C-n>'] = cmp.mapping.select_next_item(cmp_select),
  ['<C-y>'] = cmp.mapping.confirm({ select = true }),
  ["<C-Space>"] = cmp.mapping.complete(),
})
lsp.on_attach(function(client, bufnr)
	local opts = {buffer = bufnr, remap = false}

	vim.keymap.set("n", "gd", function() vim.lsp.buf.definition() end, opts)
	vim.keymap.set("n", "gt", function() vim.lsp.buf.type_definition() end, opts)
	vim.keymap.set("n", "gi", function() vim.lsp.buf.implementation() end, opts)
	vim.keymap.set("n", "K", function() vim.lsp.buf.hover() end, opts)
	vim.keymap.set("n", "<leader>vws", function() vim.lsp.buf.workspace_symbol() end, opts)
	vim.keymap.set("n", "<leader>vd", function() vim.diagnostic.open_float() end, opts)
	vim.keymap.set("n", "[d", function() vim.diagnostic.goto_next() end, opts)
	vim.keymap.set("n", "]d", function() vim.diagnostic.goto_prev() end, opts)
	vim.keymap.set("n", "<leader>vca", function() vim.lsp.buf.code_action() end, opts)
	vim.keymap.set("n", "<leader>vrr", function() vim.lsp.buf.references() end, opts)
	vim.keymap.set("n", "<leader>vrn", function() vim.lsp.buf.rename() end, opts)
	vim.keymap.set("i", "<C-h>", function() vim.lsp.buf.signature_help() end, opts)
	vim.keymap.set("n", "<leader>dl", "<cmd>Telescope diagnostics<cr>", opts)
	vim.keymap.set("n", "<leader>dj", function() vim.diagnostic.goto_next() end, opts)
	vim.keymap.set("n", "<leader>dk", function() vim.diagnostic.goto_prev() end, opts)

end)

lsp.setup()

vim.diagnostic.config({
	virtual_text = true
})
# Installing Mason
Now that we have setup our Lsp, we finally need a way to manage language servers. That’s where mason comes in.
Mason is a tool for managing language servers in Neovim. It simplifies the process of setting up and managing servers for different programming languages. With Mason, you can easily install, uninstall, and manage different language servers to improve your editing experience in Neovim.
As usual add mason in your packer.lua file and run PackerSync .
-- Mason
use {
    "williamboman/mason.nvim",
    "jay-babu/mason-nvim-dap.nvim",
}
And then setup Mason by creating a file named mason.lua inside after/plugin folder.
-- ../after/plugin/mason.lua
require("mason").setup()
After that restart the editor and you should be able to run :Mason in your vim command. And then you can connect Neovim with your favorite programming language server.
To use Mason make sure you installed
nodeandnpmin your machine. One thing to note is you might need to setup language server for your desire language separately in your machine.
# Installing Telescope
Telescope is a plugin for Neovim that helps users easily find files, buffers, and other data in their editor. With Telescope, we can quickly search through code, open files, and browse documentation etc.
To install telescope we need add in our packer.lua and run PackerSync .
-- Telescope
use {
  'nvim-telescope/telescope.nvim', tag = '0.1.2',
-- or                            , branch = '0.1.x',
  requires = { {'nvim-lua/plenary.nvim'} }
}
Once completed, you can call :Telescope in Vim's command mode to launch the pop-up menu.
A recommended practice is to map the Telescope. You can customize to launch telescope by creating a file in after/plugin/telescope.lua .
Here is what it would look like as an example.
local builtin = require('telescope.builtin')
vim.keymap.set('n', '<leader>ff', builtin.find_files, {})
vim.keymap.set('n', '<leader>fw',function()
	builtin.grep_string({search = vim.fn.input("Grep > ")});
end)
vim.keymap.set('n', '<leader>fg', builtin.git_files, {})
# More plugins for you to try
For now. you should now have a solid foundation for setting up and customizing your Neovim editor to your specific needs. You can customize this in many ways. Try different options to see what suits you best. Here are some of the useful plugins to boost up your editing experience in Neovim.
- mbbill/undotree - undo history virtualizer for vim
- vim-fugitive - git integration in vim
- galaxyline - neovim status line plugin
- iamcco/markdown-preview - neovim markdown preview
- nvim-dap - neovim debug adapter protocol
- numToStr/Comment.nvim - easy comment
- tpope/vim-surround - easily manipulate surroundings (parentheses, quotes, etc.)
# Complete Config
Check out the complete config here in Github .