Neovim from scratch with Lazy.nvim
Yet another guide to build your Neovim environment from the ground up using Lazy.nvim.
Recently I switched my Neovim plugin manager to Lazy.nvim from Packer . This article is going to be second version of my complete guide to Neovim setup from scratch using Lazy.
I will be using a simple docker instance and step by step work you through how to create a feature complete text editor.
Make sure you have installed the latest version of Neovim and have git installed.
# Configuration location
Let's start by creating a Neovim configuration file.
Go and look for nvim configuration folder under your home directory ~/.config/nvim. You can create one if you don't have any.

# Basic configurations
Before we dive into crazy plugin system, I'd like to add basic sets and remaps first.
Here is how my favorite configuration structure looks like
└── ~/.config/nvim/
    ├── lua/
    │   ├── core
    │   └── plugins
    └── init.lua
I like to put the default Neovim configurations in core directory, for things like remaps and sets.
Let's go ahead and create a file called sets.lua under core directory.
-- lua/core/sets.lua

vim.g.netrw_banner = 0
vim.opt.guicursor = ""
vim.opt.spelllang = "en_us"
vim.opt.nu = true
vim.opt.relativenumber = true
vim.opt.clipboard = "unnamedplus"
vim.opt.tabstop = 4
vim.opt.softtabstop = 4
vim.opt.shiftwidth = 4
vim.opt.expandtab = true
vim.opt.smartindent = true
vim.opt.wrap = false
vim.opt.hlsearch = false
vim.opt.incsearch = true
vim.opt.termguicolors = true
vim.opt.scrolloff = 8
vim.opt.signcolumn = "yes"
vim.opt.isfname:append("@-@")
vim.opt.updatetime = 50
vim.opt.colorcolumn = "80"
vim.opt.swapfile = false
vim.opt.backup = false
vim.opt.undodir = os.getenv("HOME") .. "/.vim/undodir"
vim.opt.undofile = true
vim.o.tabstop = 2
vim.o.shiftwidth = 2
vim.o.expandtab = true
Same for remaps.lua as well.
-- lua/core/remaps.lua

-- leader key mapping
vim.g.mapleader = " ";

-- Open netrw
vim.keymap.set("n","<leader>pv",vim.cmd.Ex);

-- move up and down
vim.keymap.set("v", "K", ":m '<-2<CR>gv=gv")
vim.keymap.set("v", "J", ":m '>+1<CR>gv=gv")

-- half page movement
vim.keymap.set("n", "<C-d>", "<C-d>zz")
vim.keymap.set("n", "<C-u>", "<C-u>zz")

-- jk escape
vim.keymap.set("i", "jk", "<ESC>")
Now, let's make sure your directory look like below
.
└── ~/.config/nvim/
    ├── lua/
    │   ├── core/
    │   │   ├── sets.lua
    │   │   └── remaps.lua
    │   └── plugins
    └── init.lua
# Including modules
Great! we now have two configuration files but if you open your editor, you will see no apparent changes at all.
The reason is we just created two separate Lua files that has nothing to do with the Neovim configuration itself. We will have to somehow let Neovim to import them.
In Neovim, the init.lua at the root of the config is the entry root for all of our Lua modules. All we have to do is import those configurations to init.lua at the root of .config/nvim.
Before we do that let's create a file named init.lua inside core directory and include those two modules.
-- /core/init.lua
require("core.remaps")
require("core.sets")
Then you can import the core module itself into root's init.lua file.
-- /.config/nvim/init.lua
require("core")
After that you can now quit Neovim and launch it again . You should see all the configuration working properly.
Your final directory should look like this.
.
└── ~/.config/nvim/
    ├── lua/
    │   ├── core/
    │   │   ├── init.lua
    │   │   ├── sets.lua
    │   │   └── remaps.lua
    │   └── plugins
    └── init.lua
# Installing Plugins with lazy.nvim
As for next step, let's install our lazy.nvim .
Create a file named lazi.lua under Lua folder. You can checkout lazy.nvim github for more options and configurations. Here is what I will be using in this setup.
-- /.config/nvim/lua/lazi.lua

local lazypath = vim.fn.stdpath("data") .. "/lazy/lazy.nvim"
if not vim.loop.fs_stat(lazypath) then
  vim.fn.system({
    "git",
    "clone",
    "--filter=blob:none",
    "https://github.com/folke/lazy.nvim.git",
    "--branch=stable", -- latest stable release
    lazypath,
  })
end
vim.opt.rtp:prepend(lazypath)

require('lazy').setup({
  { import = 'plugins' },
})
Include the lazy configuration to your root init file.
-- /.config/nvim/init.lua
require("core")
require("lazi")
After this is all you have to do is restart Neovim.
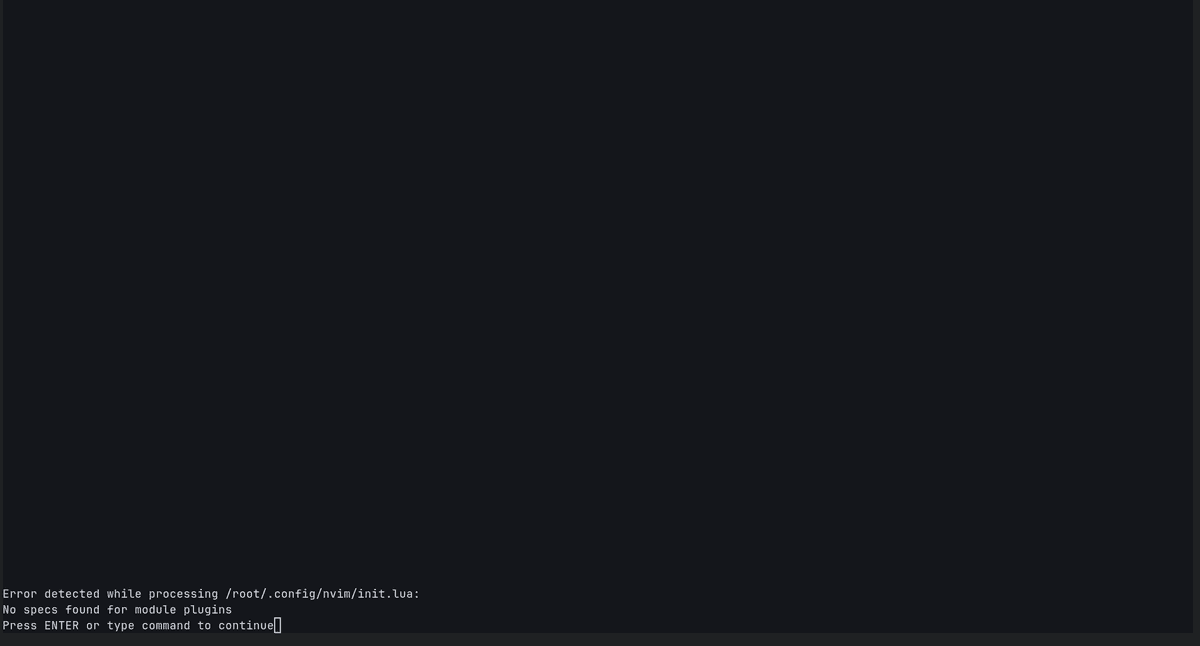
Once you restart your editor, you should see message like this, no module plugins found.
Let's take a step back and look at our configuration file.
require('lazy').setup({
  { import = 'plugins' },
})
In our lazi.lua , you can see import = 'plugins' . What it means is lazy is looking for plugins in plugins directory we defined which currently is empty.
It's time for us to throw our favorite plugins in the folder.
# Installing plugins
Let's see how we can install plugins with lazy.
# Treesitter
To install treesitter , you need to create a file named treesitter.lua inside plugin folder.
-- ~/.config/nvim/lua/plugins/treesitter.lua

return {
    "nvim-treesitter/nvim-treesitter",
    config = function()
                local configs = require("nvim-treesitter.configs")

                configs.setup({
                    ensure_installed = { "c", "lua", "vim", "vimdoc", "rust", "javascript", "html" },
                    sync_install = false,
                    highlight = { enable = true },
                    indent = { enable = true },
                })
    end;
}
You can check out more configuration in treesitter official documentation. Restart Neovim and then sit back and relax you should see Lazy doing all the work for you.
# Mason
To install mason , create another file in plugins directory.
return {
  "williamboman/mason.nvim",
  dependencies = {
    "williamboman/mason-lspconfig.nvim",
    "WhoIsSethDaniel/mason-tool-installer.nvim",
  },
  config = function()
    -- import mason
    local mason = require("mason")

    -- import mason-lspconfig
    local mason_lspconfig = require("mason-lspconfig")

    local mason_tool_installer = require("mason-tool-installer")

    -- enable mason and configure icons
    mason.setup({
      ui = {
        icons = {
          package_installed = "✓",
          package_pending = "➜",
          package_uninstalled = "✗",
        },
      },
    })

    mason_lspconfig.setup({
      -- list of servers for mason to install
      ensure_installed = {
        "tsserver",
        "html",
        "cssls",
        "tailwindcss",
        "svelte",
        "lua_ls",
        "graphql",
        "emmet_ls",
      },
      -- auto-install configured servers (with lspconfig)
      automatic_installation = true, -- not the same as ensure_installed
    })

    mason_tool_installer.setup({
      ensure_installed = {
        "prettier", -- prettier formatter
        "stylua", -- lua formatter
        "eslint_d", -- js linter
      },
    })
  end,
}
As for a quick check your directory structure should look like this.
.
└── ~/.config/nvim/
    ├── lua/
    │   ├── core/
    │   │   ├── init.lua
    │   │   ├── sets.lua
    │   │   └── remaps.lua
    │   └── plugins
    │   │   ├── treesitter.lua
    │   │   ├── .....lua
    │   │   └── mason.lua
    │   └── lazi.lua
    └── init.lua
# Installing lsp
return {
	"neovim/nvim-lspconfig",
	config = function()
		-- Setup language servers.
		local lspconfig = require("lspconfig")
		lspconfig.pyright.setup({})
		lspconfig.tsserver.setup({})
		lspconfig.emmet_language_server.setup({
			filetypes = {
				"css",
        "svelte",
				"eruby",
				"html",
				"javascript",
				"javascriptreact",
				"less",
				"sass",
				"scss",
				"pug",
				"typescriptreact",
			},
			-- Read more about this options in the [vscode docs](https://code.visualstudio.com/docs/editor/emmet#_emmet-configuration).
			-- **Note:** only the options listed in the table are supported.
			init_options = {
				---@type table<string, string>
				includeLanguages = {},
				--- @type string[]
				excludeLanguages = {},
				--- @type string[]
				extensionsPath = {},
				--- @type table<string, any> [Emmet Docs](https://docs.emmet.io/customization/preferences/)
				preferences = {},
				--- @type boolean Defaults to `true`
				showAbbreviationSuggestions = true,
				--- @type "always" | "never" Defaults to `"always"`
				showExpandedAbbreviation = "always",
				--- @type boolean Defaults to `false`
				showSuggestionsAsSnippets = false,
				--- @type table<string, any> [Emmet Docs](https://docs.emmet.io/customization/syntax-profiles/)
				syntaxProfiles = {},
				--- @type table<string, string> [Emmet Docs](https://docs.emmet.io/customization/snippets/#variables)
				variables = {},
			},
		})
		lspconfig.svelte.setup({})
		lspconfig.clangd.setup({})
		lspconfig.tailwindcss.setup({})
		lspconfig.rust_analyzer.setup({
			-- Server-specific settings. See `:help lspconfig-setup`
			settings = {
				["rust-analyzer"] = {
          checkOnSave = {
            command = "clippy",
          },
        },
			},
		})
		-- Global mappings.
		-- See `:help vim.diagnostic.*` for documentation on any of the below functions
		--
		vim.keymap.set("n", "<leader>dp", vim.diagnostic.goto_prev)
		vim.keymap.set("n", "<leader>dn", vim.diagnostic.goto_next)
		vim.keymap.set("n", "<space>df", vim.diagnostic.open_float)
		vim.keymap.set("n", "<space>dl", vim.diagnostic.setloclist)

		-- Use LspAttach autocommand to only map the following keys
		-- after the language server attaches to the current buffer
		vim.api.nvim_create_autocmd("LspAttach", {
			group = vim.api.nvim_create_augroup("UserLspConfig", {}),
			callback = function(ev)
				-- Enable completion triggered by <c-x><c-o>
				vim.bo[ev.buf].omnifunc = "v:lua.vim.lsp.omnifunc"

				-- Buffer local mappings.
				-- See `:help vim.lsp.*` for documentation on any of the below functions
				local opts = { buffer = ev.buf }
				vim.keymap.set("n", "gD", vim.lsp.buf.declaration, opts)
				vim.keymap.set("n", "gd", vim.lsp.buf.definition, opts)
				vim.keymap.set("n", "K", vim.lsp.buf.hover, opts)
				vim.keymap.set("n", "gi", vim.lsp.buf.implementation, opts)
				vim.keymap.set("n", "gt", vim.lsp.buf.type_definition, opts)
				vim.keymap.set("n", "gr", vim.lsp.buf.references, opts)
				vim.keymap.set("n", "<leader>r", vim.lsp.buf.rename, opts)
				vim.keymap.set({ "n", "v" }, "<leader>ca", vim.lsp.buf.code_action, opts)

				vim.keymap.set("n", "<C-k>", vim.lsp.buf.signature_help, opts)
				vim.keymap.set("n", "<space>wa", vim.lsp.buf.add_workspace_folder, opts)
				vim.keymap.set("n", "<space>wr", vim.lsp.buf.remove_workspace_folder, opts)
				vim.keymap.set("n", "<space>wl", function()
					print(vim.inspect(vim.lsp.buf.list_workspace_folders()))
				end, opts)
				vim.keymap.set("n", "<space>f", function()
					vim.lsp.buf.format({ async = true })
				end, opts)
			end,
		})
	end,
}
You should see the pattern by now. If you want to add a plugin, create a file in plugins folder and then let lazy do the job. Most of the plugins now have guide to install via lazy readily.
Lazy also watch for changes and you should see it automatically installing new plugins.
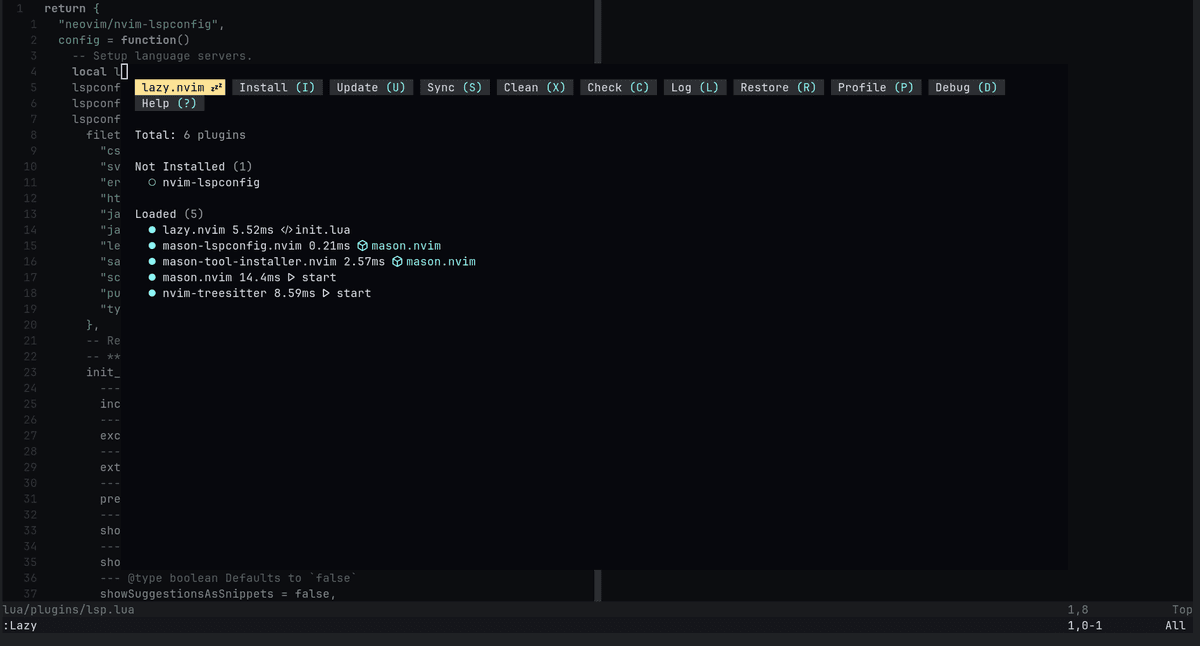
You can also manually open the menu using :Lazy command as well.
That's it. Hopefully this article is helpful for you if you are planning to try lazy.nvim.
I recommend you definitely should.